Set up SSO with Microsoft Entra ID
dbt Enterprise-tier plans support single-sign on via Microsoft Entra ID (formerly Azure AD).
After setting up single sign-on (SSO), you can set up System for Cross-Domain Identity Management (SCIM) with Entra ID to automate user and group provisioning.
Currently supported SSO features include:
- IdP-initiated SSO
- SP-initiated SSO
- Just-in-time provisioning
Configuration
dbt supports both single tenant and multi-tenant Microsoft Entra ID (formerly Azure AD) SSO Connections. For most Enterprise purposes, you will want to use the single-tenant flow when creating a Microsoft Entra ID Application.
Creating an application
Log into the Azure portal for your organization. Using the Microsoft Entra ID page, you will need to select the appropriate directory and then register a new application.
- Under Manage, select App registrations.
- Click + New Registration to begin creating a new application registration.
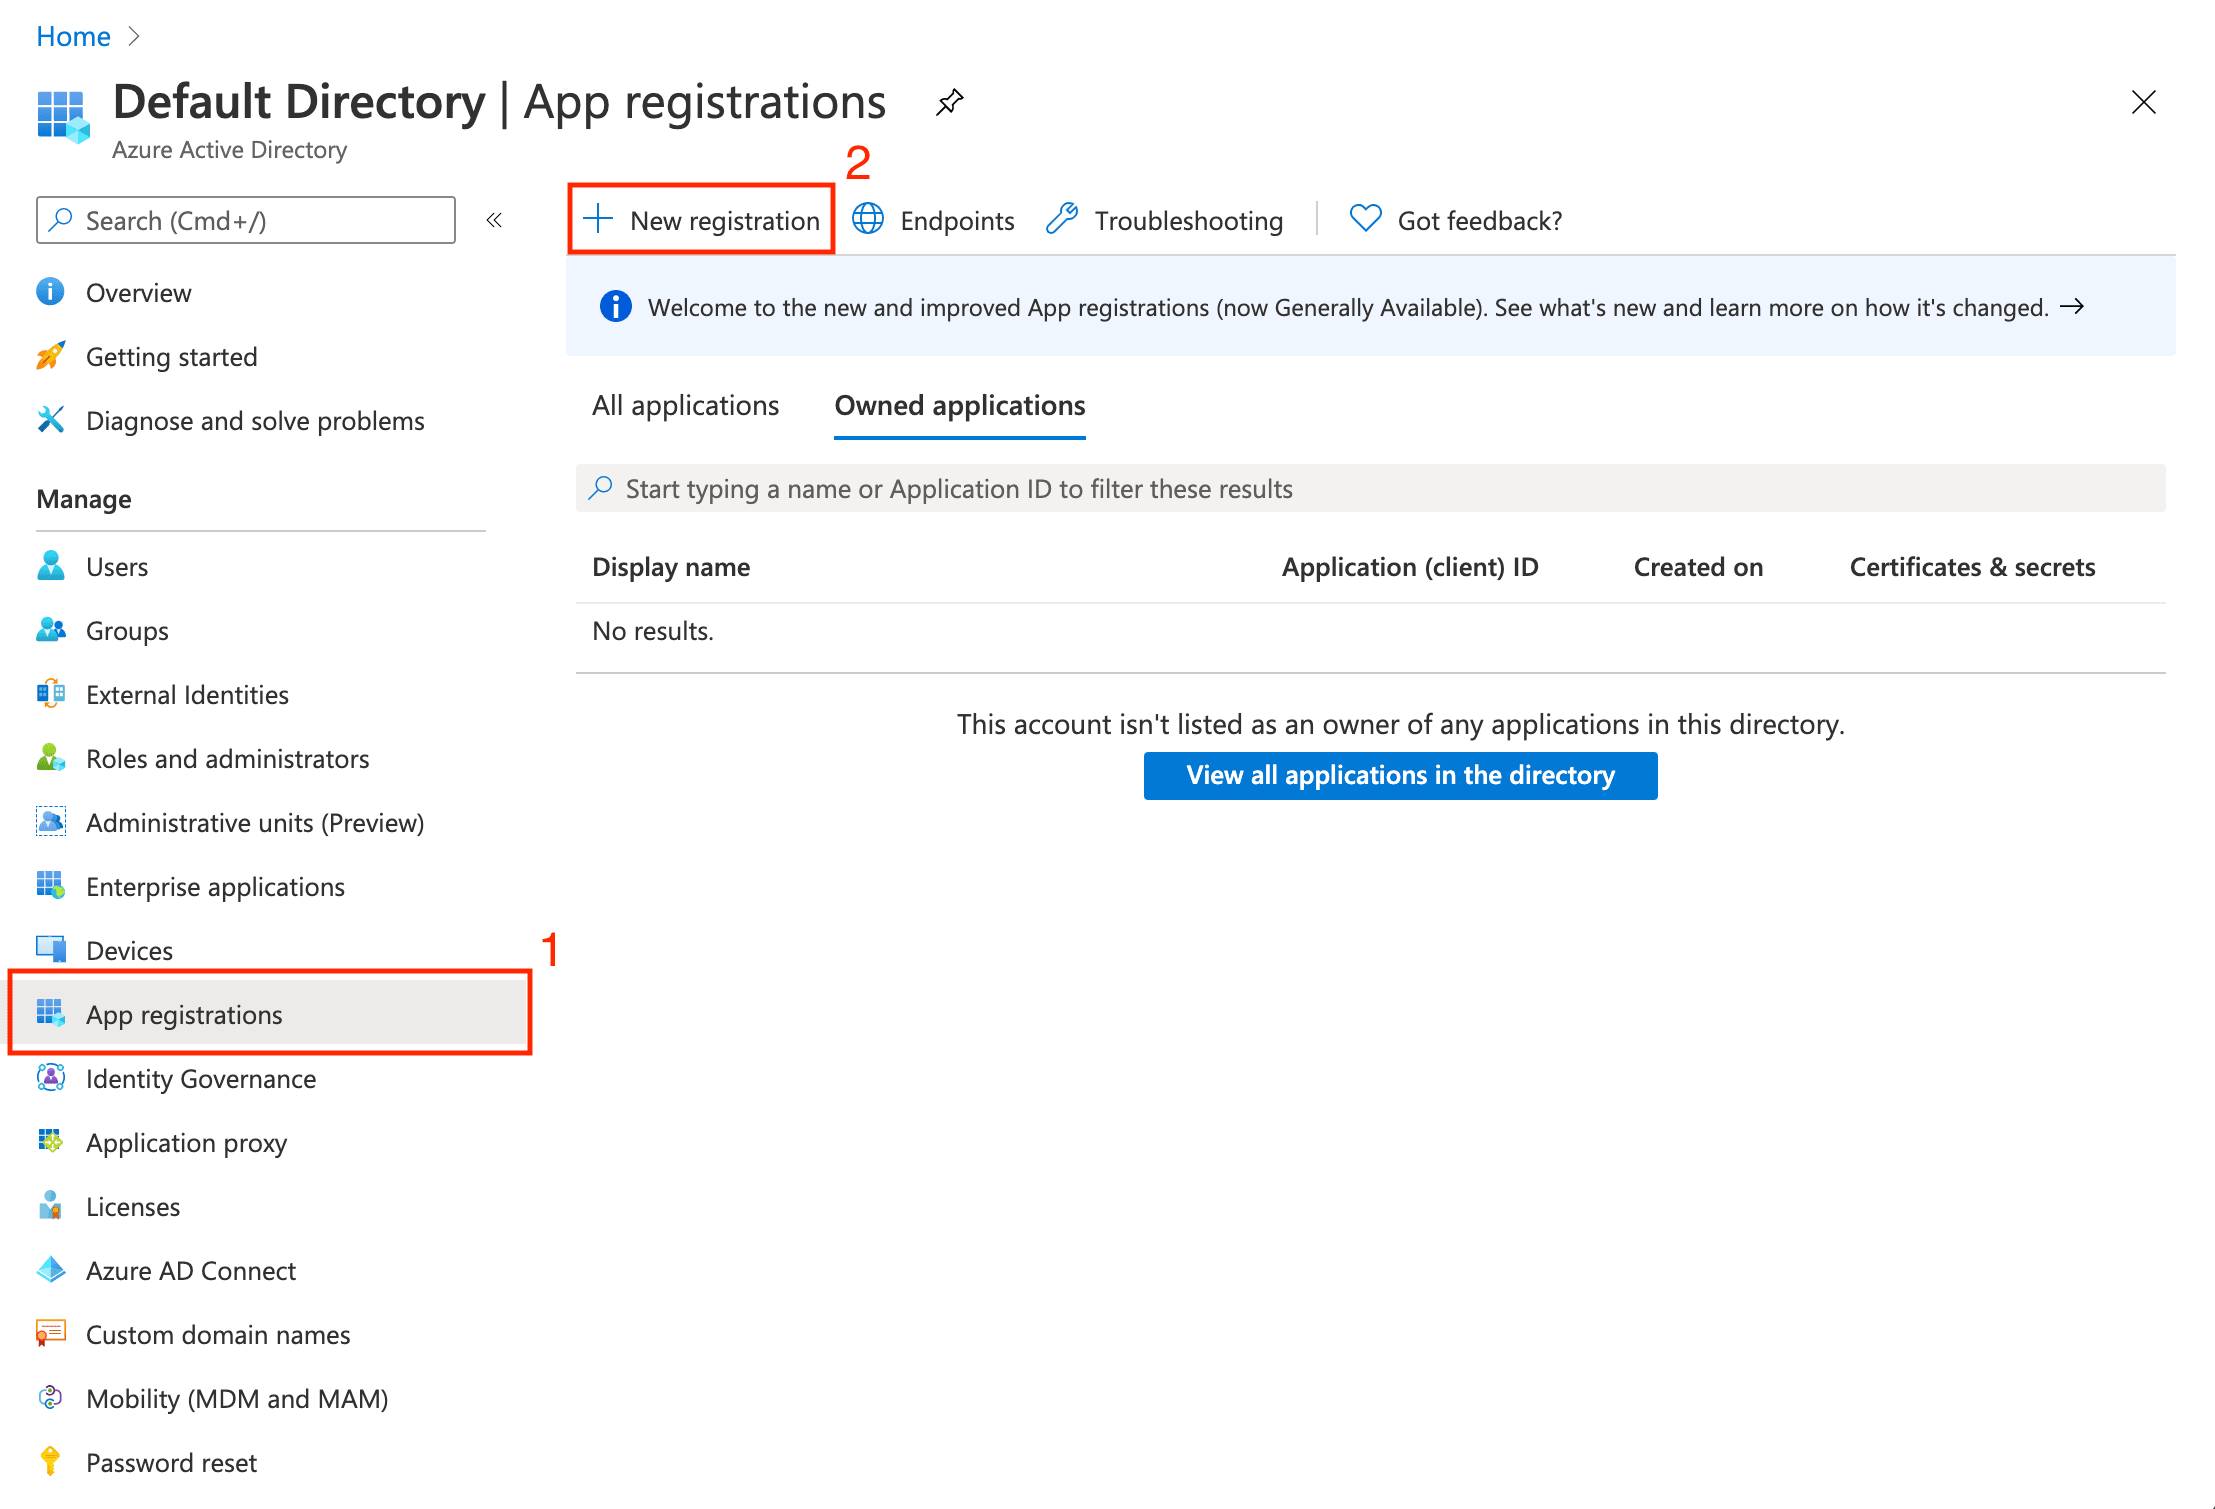 Creating a new app registration
- Supply configurations for the Name and Supported account types fields. Choose the Supported account types value based on which tenants you want to allow, and note the matching Microsoft Entra ID Domain value you'll need later when supplying credentials in dbt:
| Customer need | Supported account types (Azure) | Value to enter in dbt's Microsoft Entra ID Domain field |
|---|---|---|
| One tenant only (default, recommended for most enterprise use-cases) | Accounts in this organizational directory only | The primary domain name for your Azure directory |
| Multiple specific Entra ID tenants | Accounts in organizational directories set by Entra admin | organizations |
| Any org tenant plus personal Microsoft accounts | Accounts in any organizational directory and personal Microsoft accounts | common |
| Personal Microsoft accounts only | Personal Microsoft accounts only | consumers |
-
(Optional) To ensure your multi-tenant setup works correctly, you’ll need to make two key adjustments beyond just selecting “Multi-tenant” in your Azure account settings:
- Update the Microsoft Entra ID Domain: In the dbt “Microsoft Entra ID Domain:” field, enter the specific authority string (
organizations,common, orconsumers) rather than the domain name for your Azure directory. For more details, see the Supplying credentials - Grant Admin Consent for Each Tenant: Because this is an Entra (formerly Azure AD) requirement, each separate tenant will need its own administrator to grant consent. If users from other tenants attempt to log in before this is done, they will see an “admin approval required” screen. An admin can resolve this by visiting the specific consent URL provided by Microsoft for their tenant (for example,
https://login.microsoftonline.com/{TENANT_ID}/adminconsent?client_id={CLIENT_ID})
- Update the Microsoft Entra ID Domain: In the dbt “Microsoft Entra ID Domain:” field, enter the specific authority string (
-
Configure the Redirect URI. The table below shows the appropriate Redirect URI values for single-tenant and multi-tenant Entra ID app deployments. For most enterprise use-cases, you will want to use the single-tenant Redirect URI. Replace
YOUR_AUTH0_URIwith the appropriate Auth0 URI for your region and plan.
Note: Your dbt platform tenancy has no bearing on this setting. This Entra ID app setting controls app access:
- Single-tenant: Only users from your Entra ID tenant can access the app.
- Multi-tenant: Users from any Entra ID tenant can access the app.
| Application Type | Redirect URI |
|---|---|
| Single-tenant (recommended) | https://YOUR_AUTH0_URI/login/callback |
| Multi-tenant | https://YOUR_AUTH0_URI/login/callback |
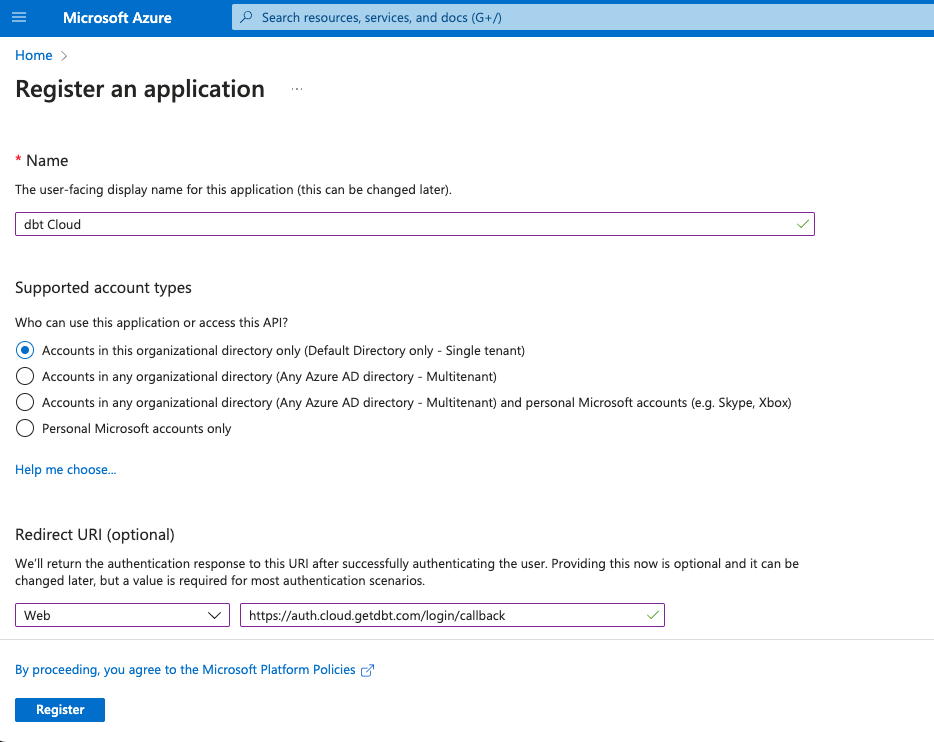 Configuring a new app registration
- Save the App registration to continue setting up Microsoft Entra ID SSO.
Depending on your Microsoft Entra ID settings, your App Registration page might look different than the screenshots shown earlier. If you are not prompted to configure a Redirect URI on the New Registration page, then follow steps 6 - 7 below after creating your App Registration. If you were able to set up the Redirect URI in the steps above, then skip ahead to step 8.
-
After registering the new application without specifying a Redirect URI, click on App registration and then navigate to the Authentication tab for the new application.
-
Click + Add platform and enter a Redirect URI for your application. See step 4 above for more information on the correct Redirect URI value for your dbt application.
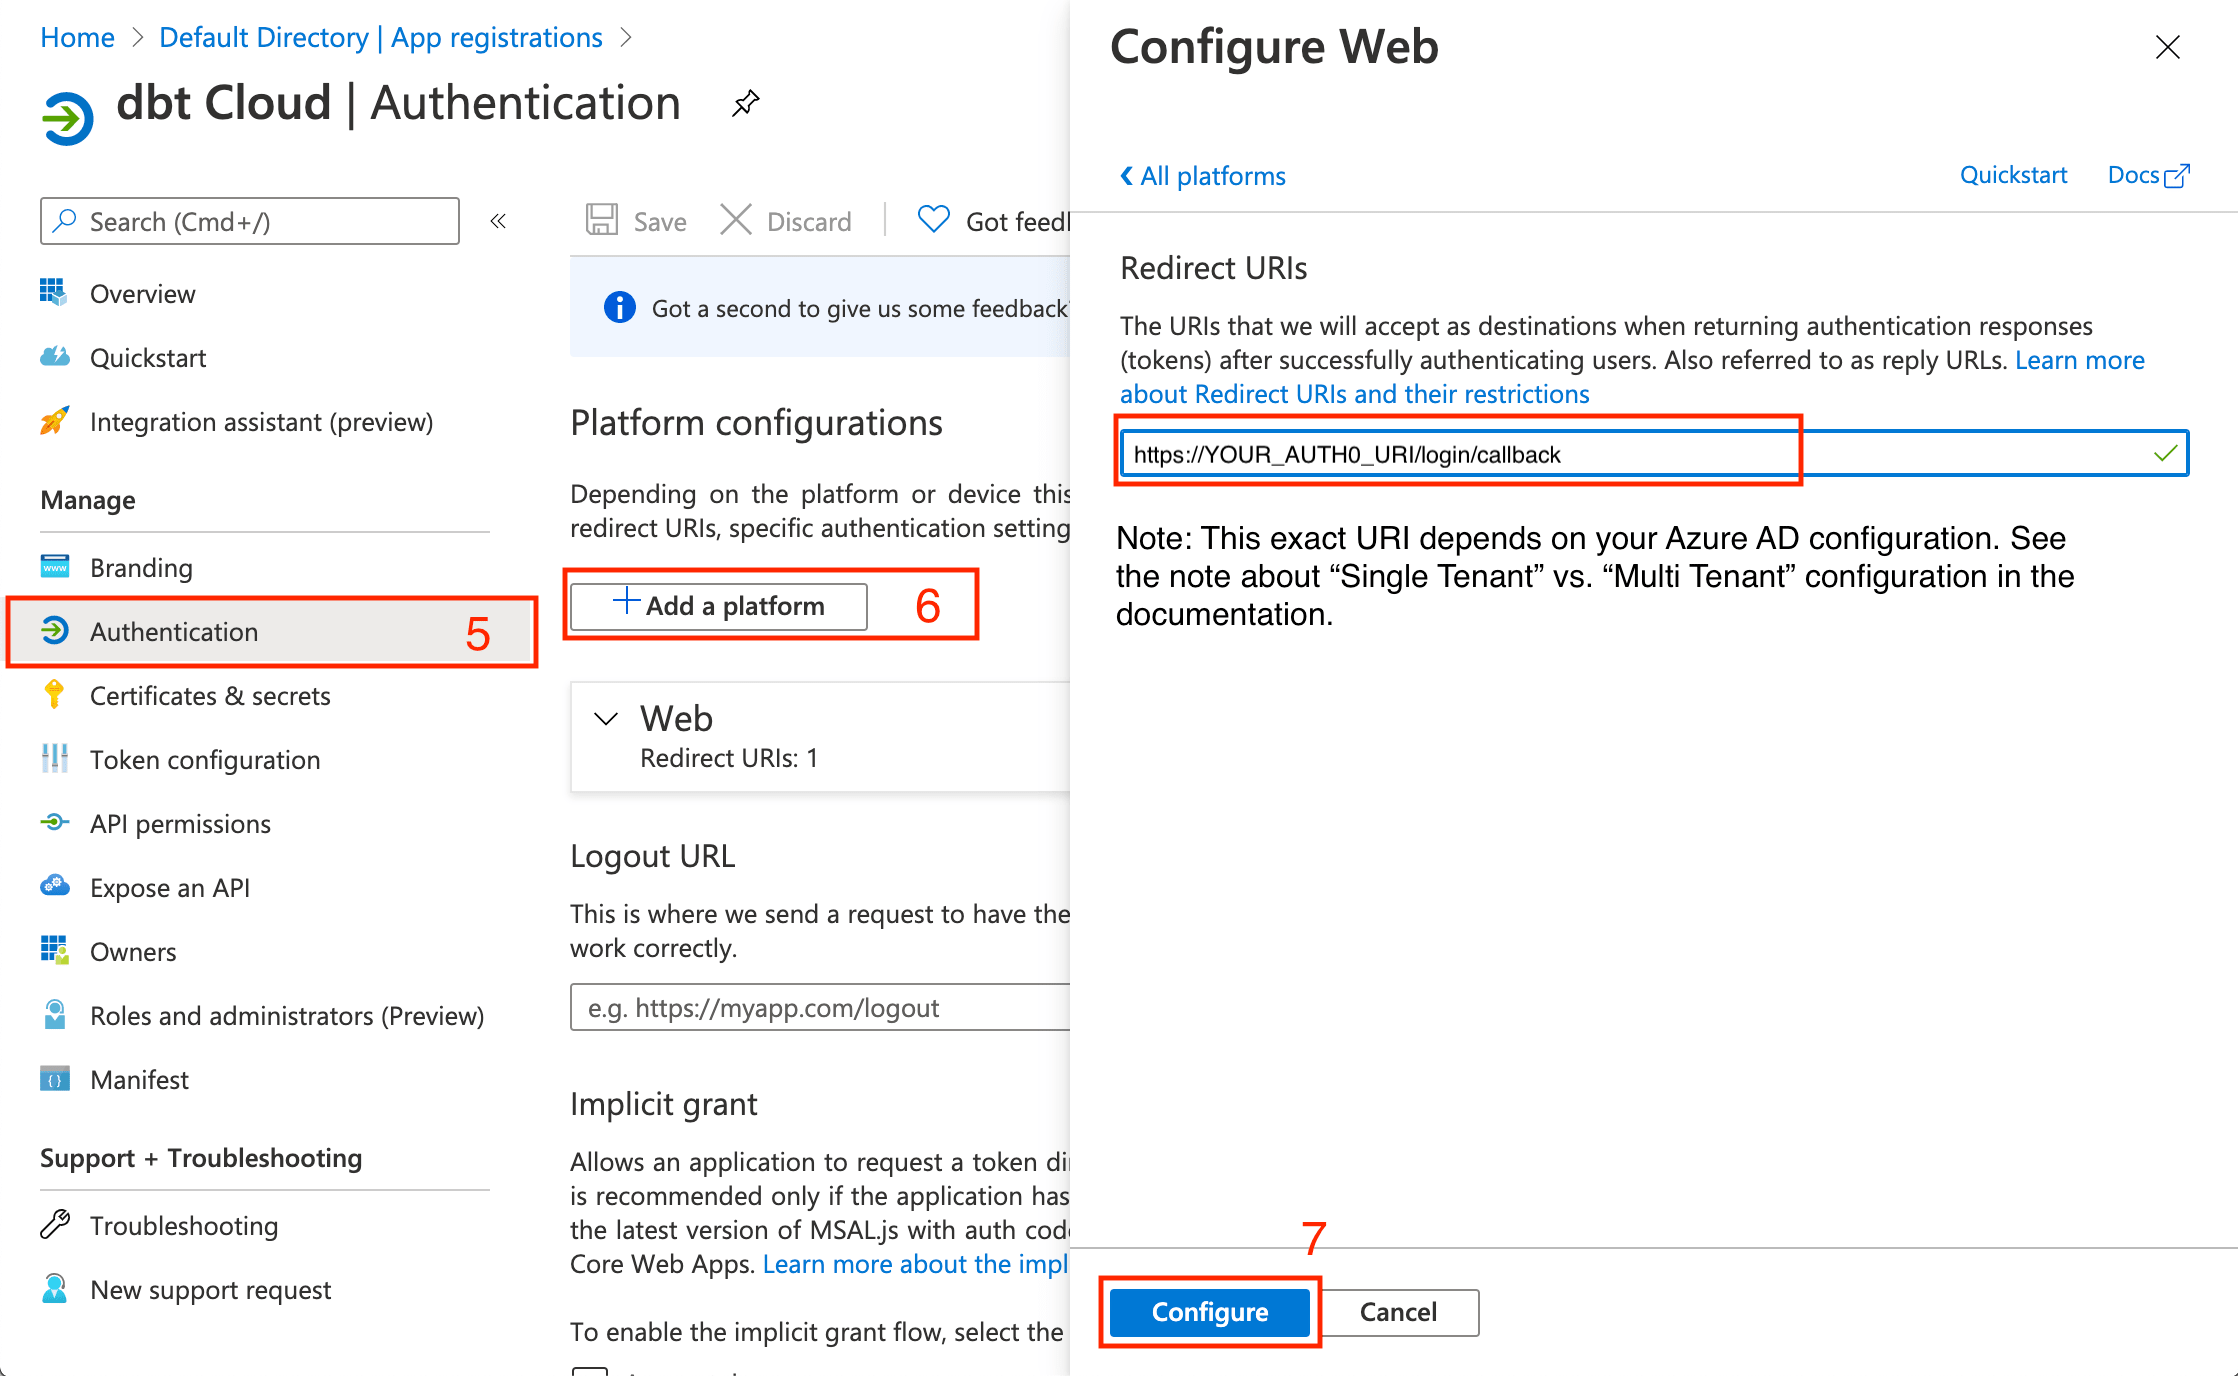 Configuring a Redirect URI
Azure <-> dbt User and Group mapping
There is a limitation on the number of groups Azure will emit (capped at 150) via the SSO token, meaning if a user belongs to more than 150 groups, it will appear as though they belong to none. To prevent this, configure group assignments with the dbt app in Azure and set a group claim so Azure emits only the relevant groups.
The Azure users and groups you will create in the following steps are mapped to groups created in dbt based on the group name. Reference the docs on enterprise permissions for additional information on how users, groups, and permission sets are configured in dbt.
The dbt platform uses the User principal name (UPN) in Microsoft Entra ID to identify and match users logging in to dbt through SSO. The UPN is usually formatted as an email address.
Adding users to an Enterprise application
Once you've registered the application, the next step is to assign users to it. Add the users you want to be viewable to dbt with the following steps:
- Navigate back to the Default Directory (or Home) and click Enterprise Applications.
- Click the name of the application you created earlier.
- Click Assign Users and Groups.
- Click Add User/Group.
- Assign additional users and groups as needed.
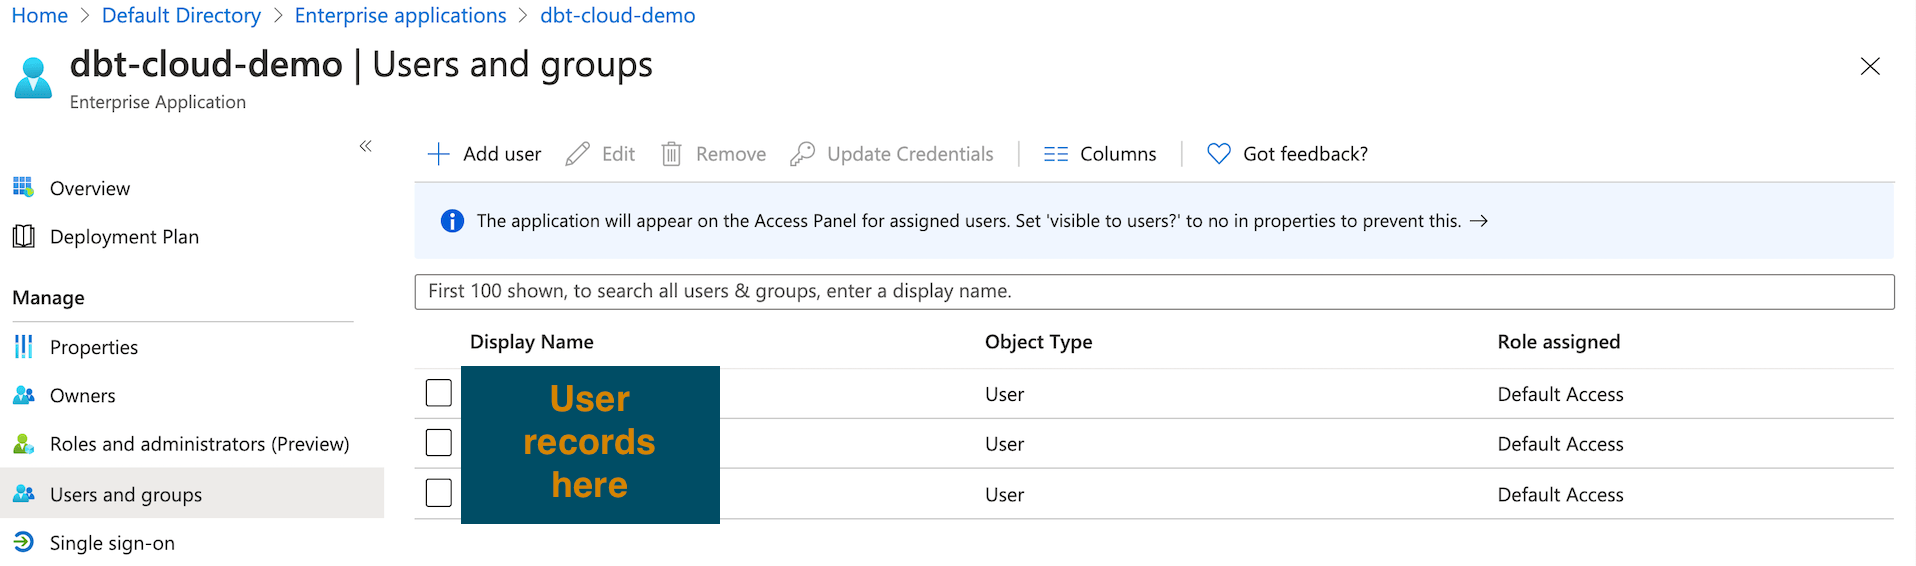 Adding Users to an Enterprise Application a Redirect URI
Under Properties check the toggle setting for User assignment required? and confirm it aligns to your requirements. Most customers will want this toggled to Yes so that only users/groups explicitly assigned to dbt will be able to sign in. If this setting is toggled to No any user will be able to access the application if they have a direct link to the application per Microsoft Entra ID Documentation
Configuring permissions
- Navigate back to Default Directory (or Home) and then App registration.
- Select your application and then select API permissions.
- Click +Add a permission and add the permissions shown in the following table:
| API Name | Type | Permission | Required? |
|---|---|---|---|
| Microsoft Graph | Delegated | User.Read | Yes |
| Microsoft Graph | Delegated | GroupMember.Read.All | Yes |
| Microsoft Graph | Delegated | Directory.Read.All | Optional — may be required if users are assigned to > 200 groups |
The default scope only requires User.Read and GroupMember.Read.All. If you assign a user to more than 200 groups, you may need to grant additional permissions such as Directory.Read.All.
If you set up SSO before December 2025, your existing configuration may request Directory.Read.All instead of GroupMember.Read.All. To use the updated scopes, delete and re-create your SSO configuration.
- Save these permissions, then click Grant admin consent to grant admin consent for this directory on behalf of all of your users.
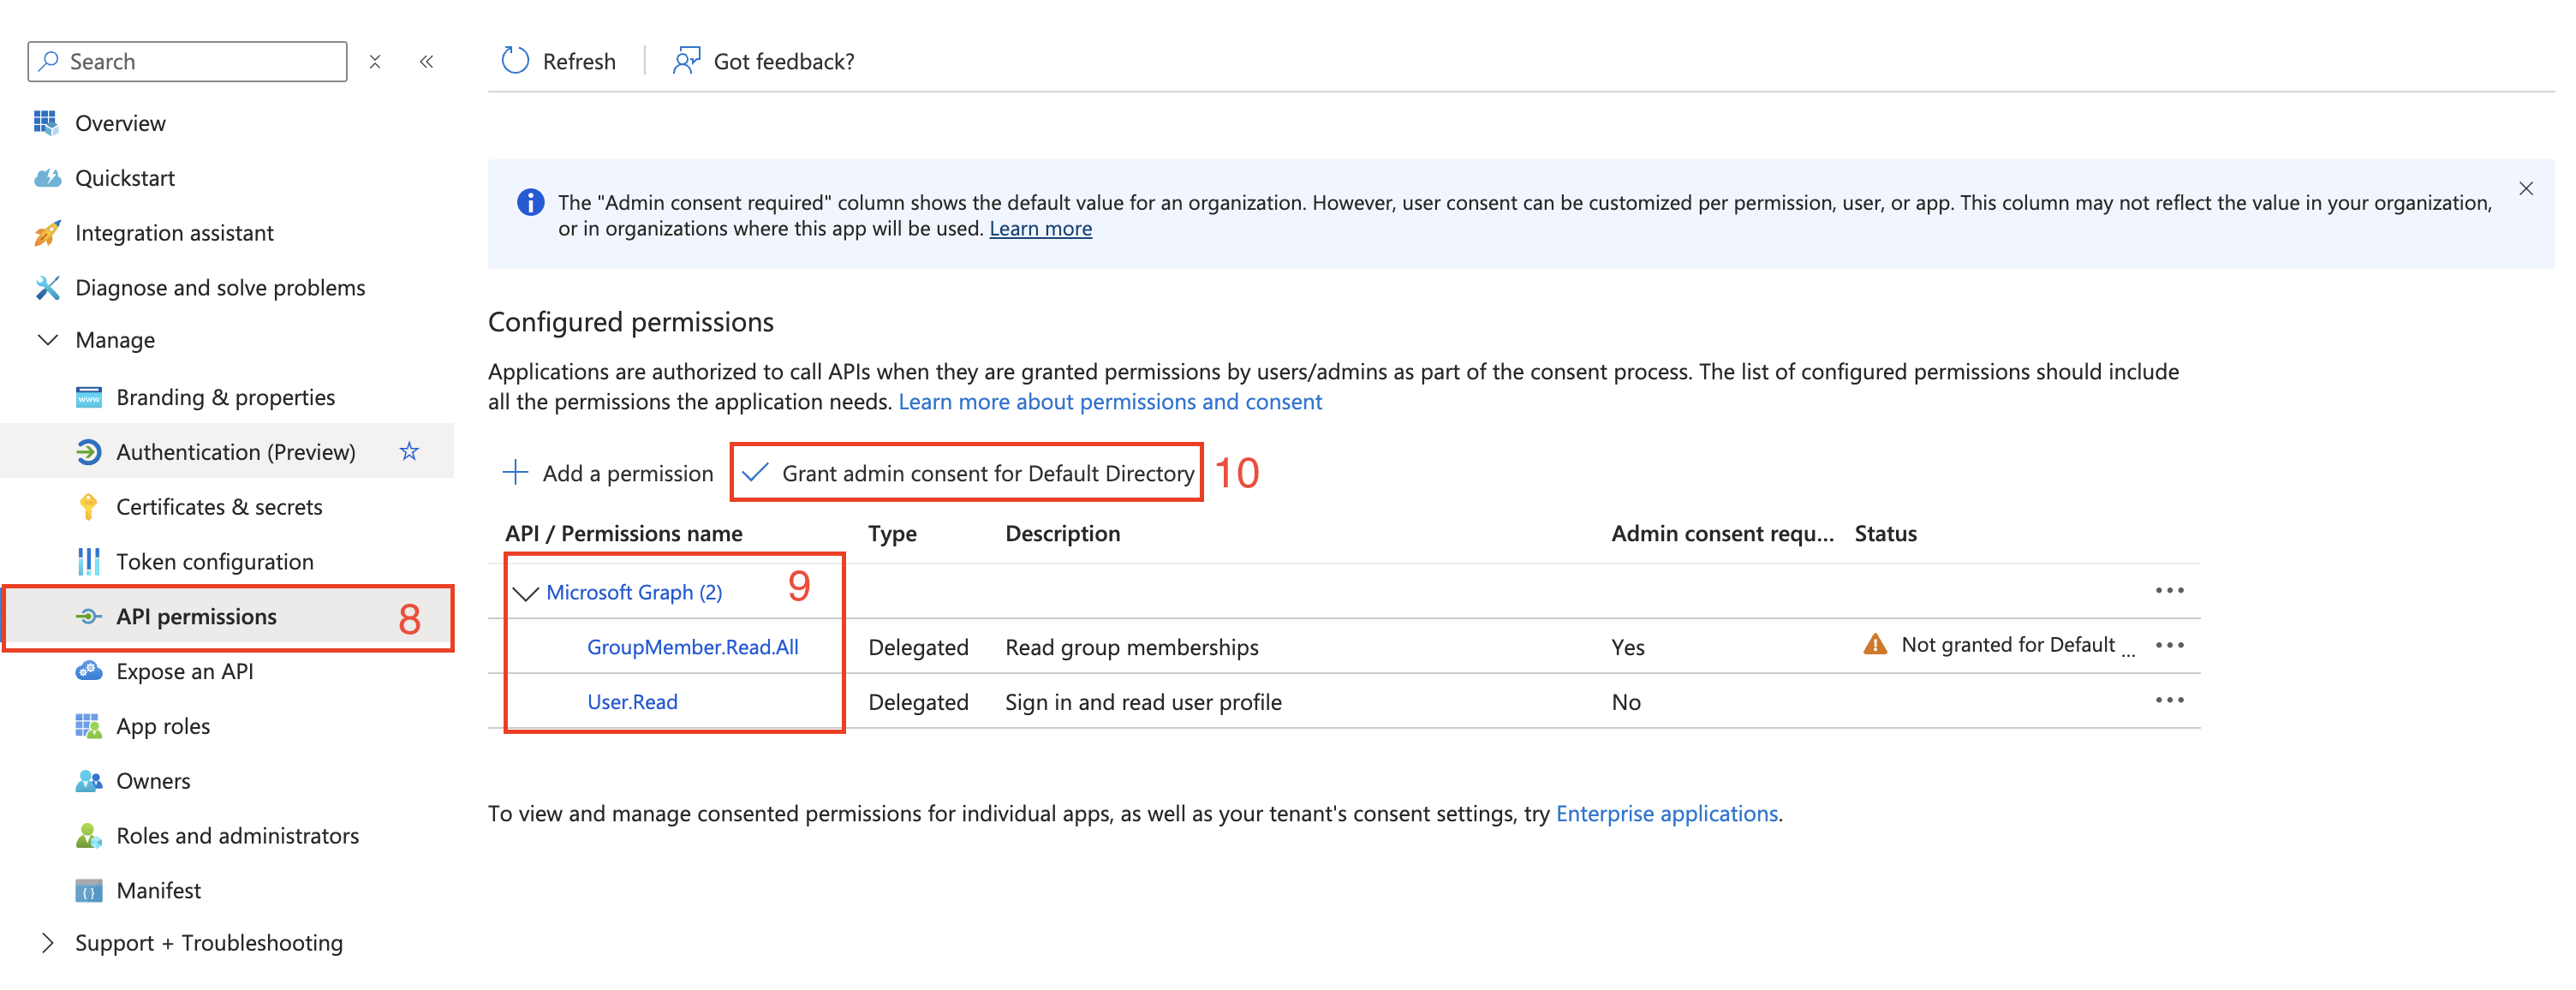 Configuring application permissions
Creating a client secret
- Under Manage, click Certificates & secrets.
- Click +New client secret.
- Name the client secret "dbt" (or similar) to identify the secret.
- Select 730 days (24 months) as the expiration value for this secret (recommended).
- Click Add to finish creating the client secret value (not the client secret ID).
- Record the generated client secret somewhere safe. Later in the setup process, we'll use this client secret in dbt to finish configuring the integration.
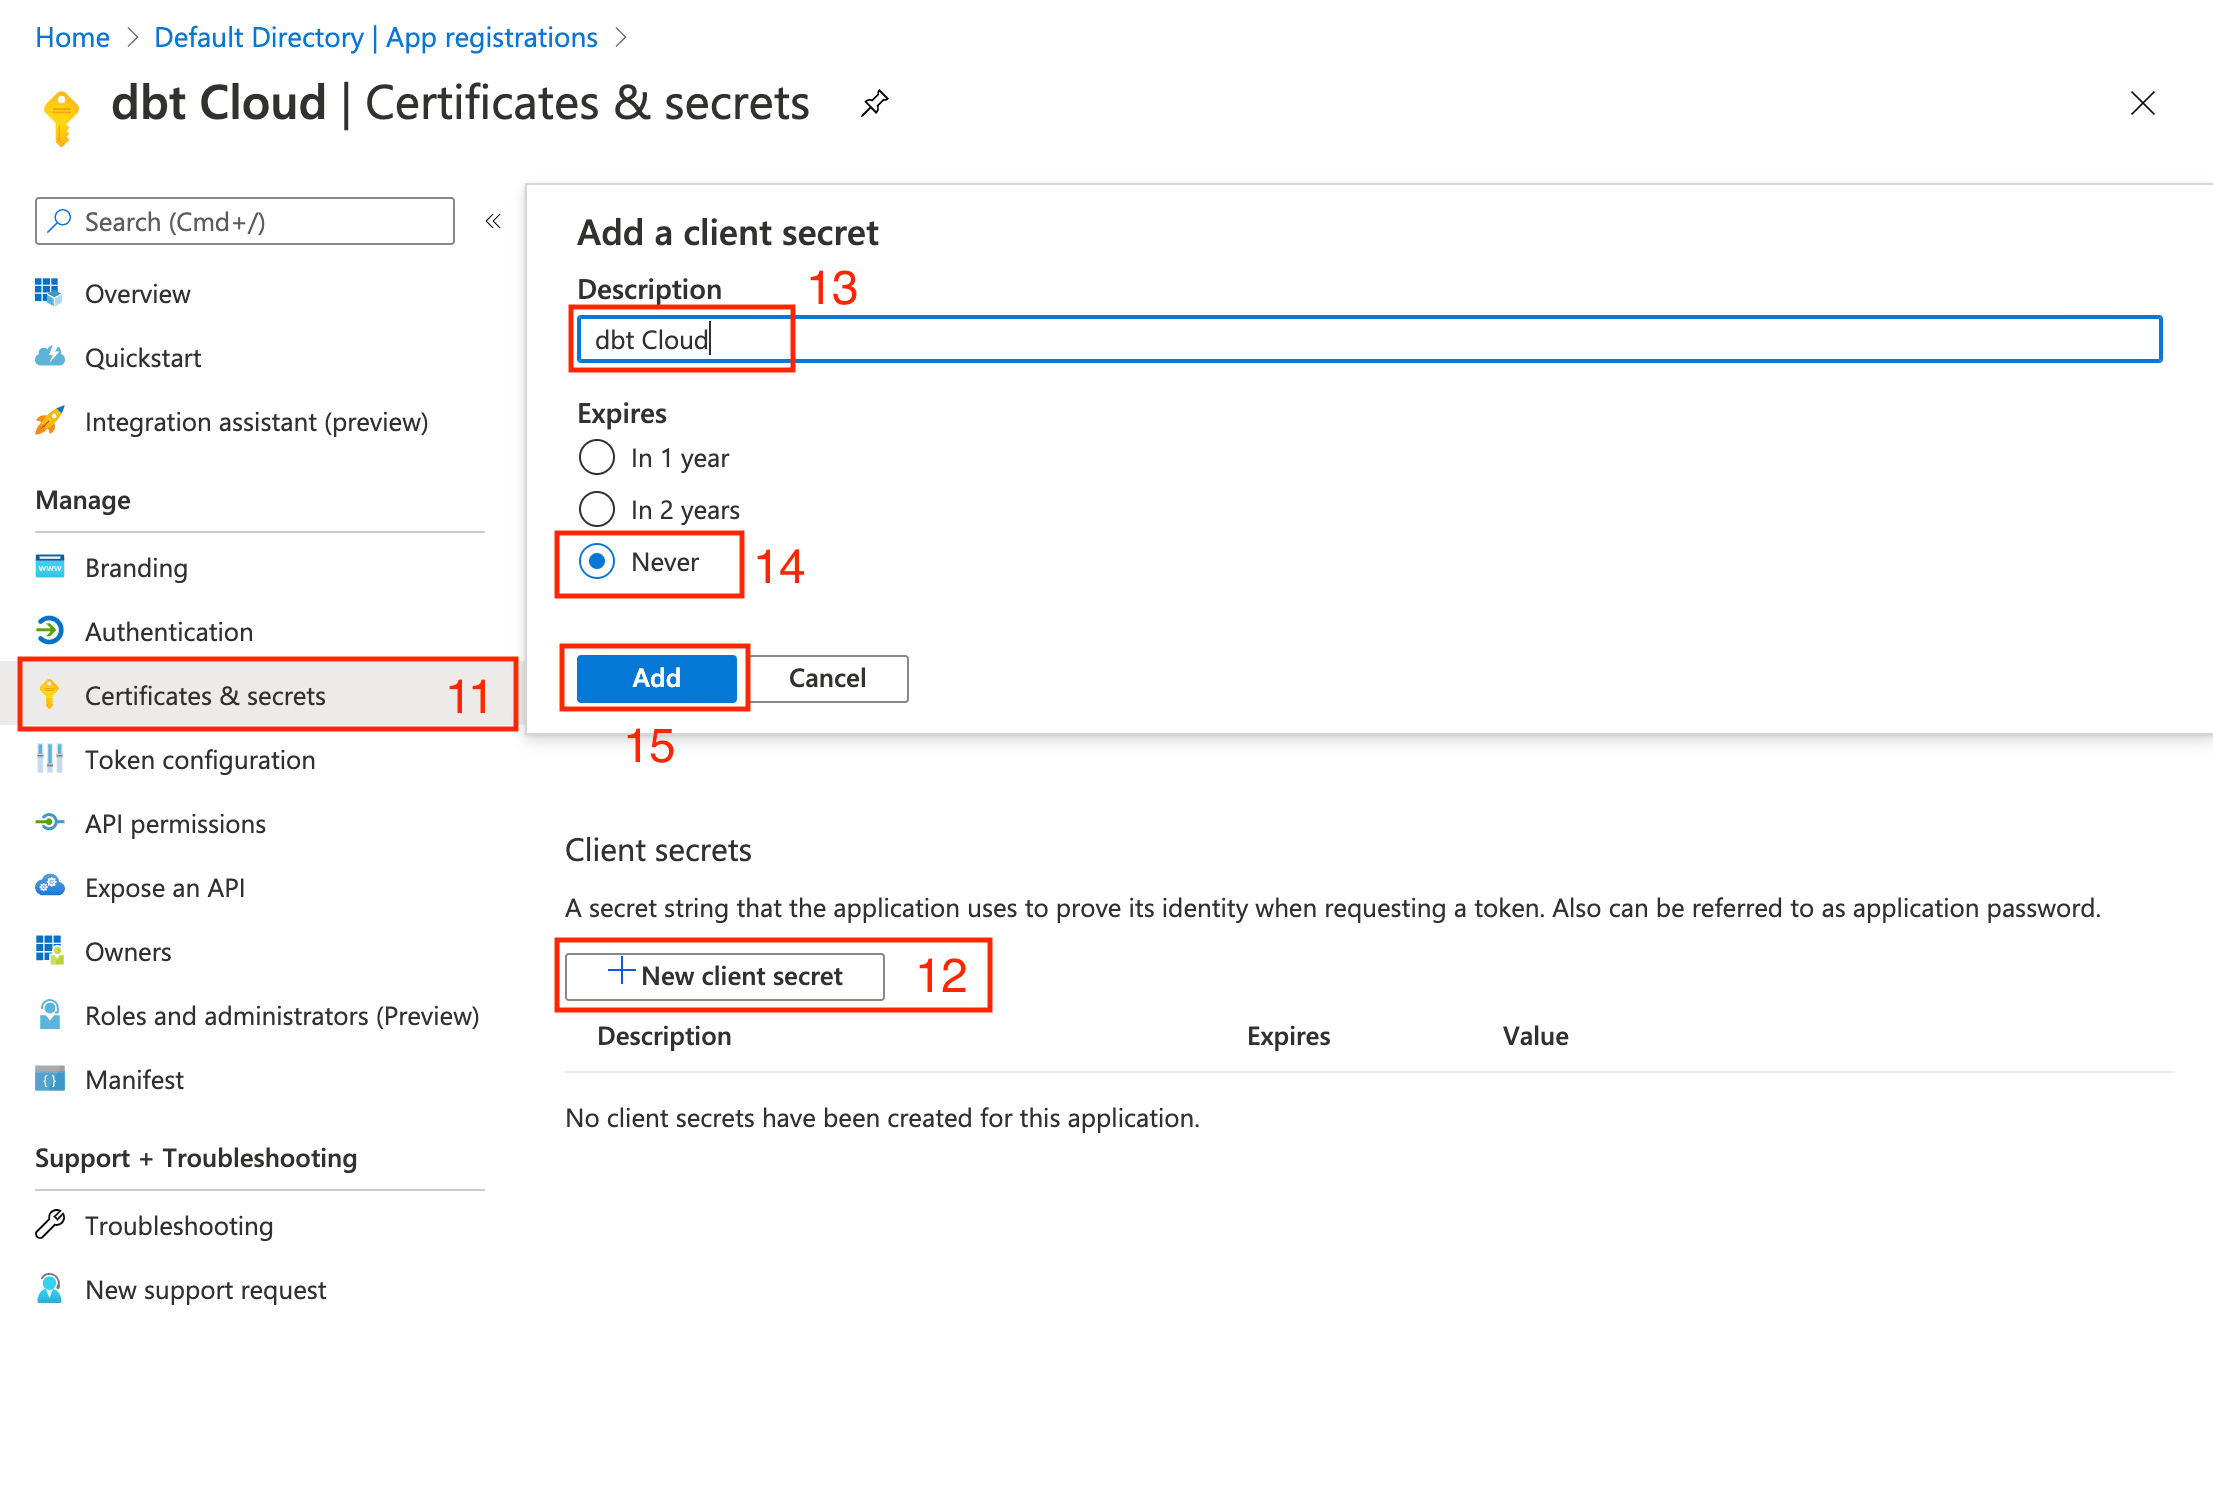 Configuring certificates & secrets
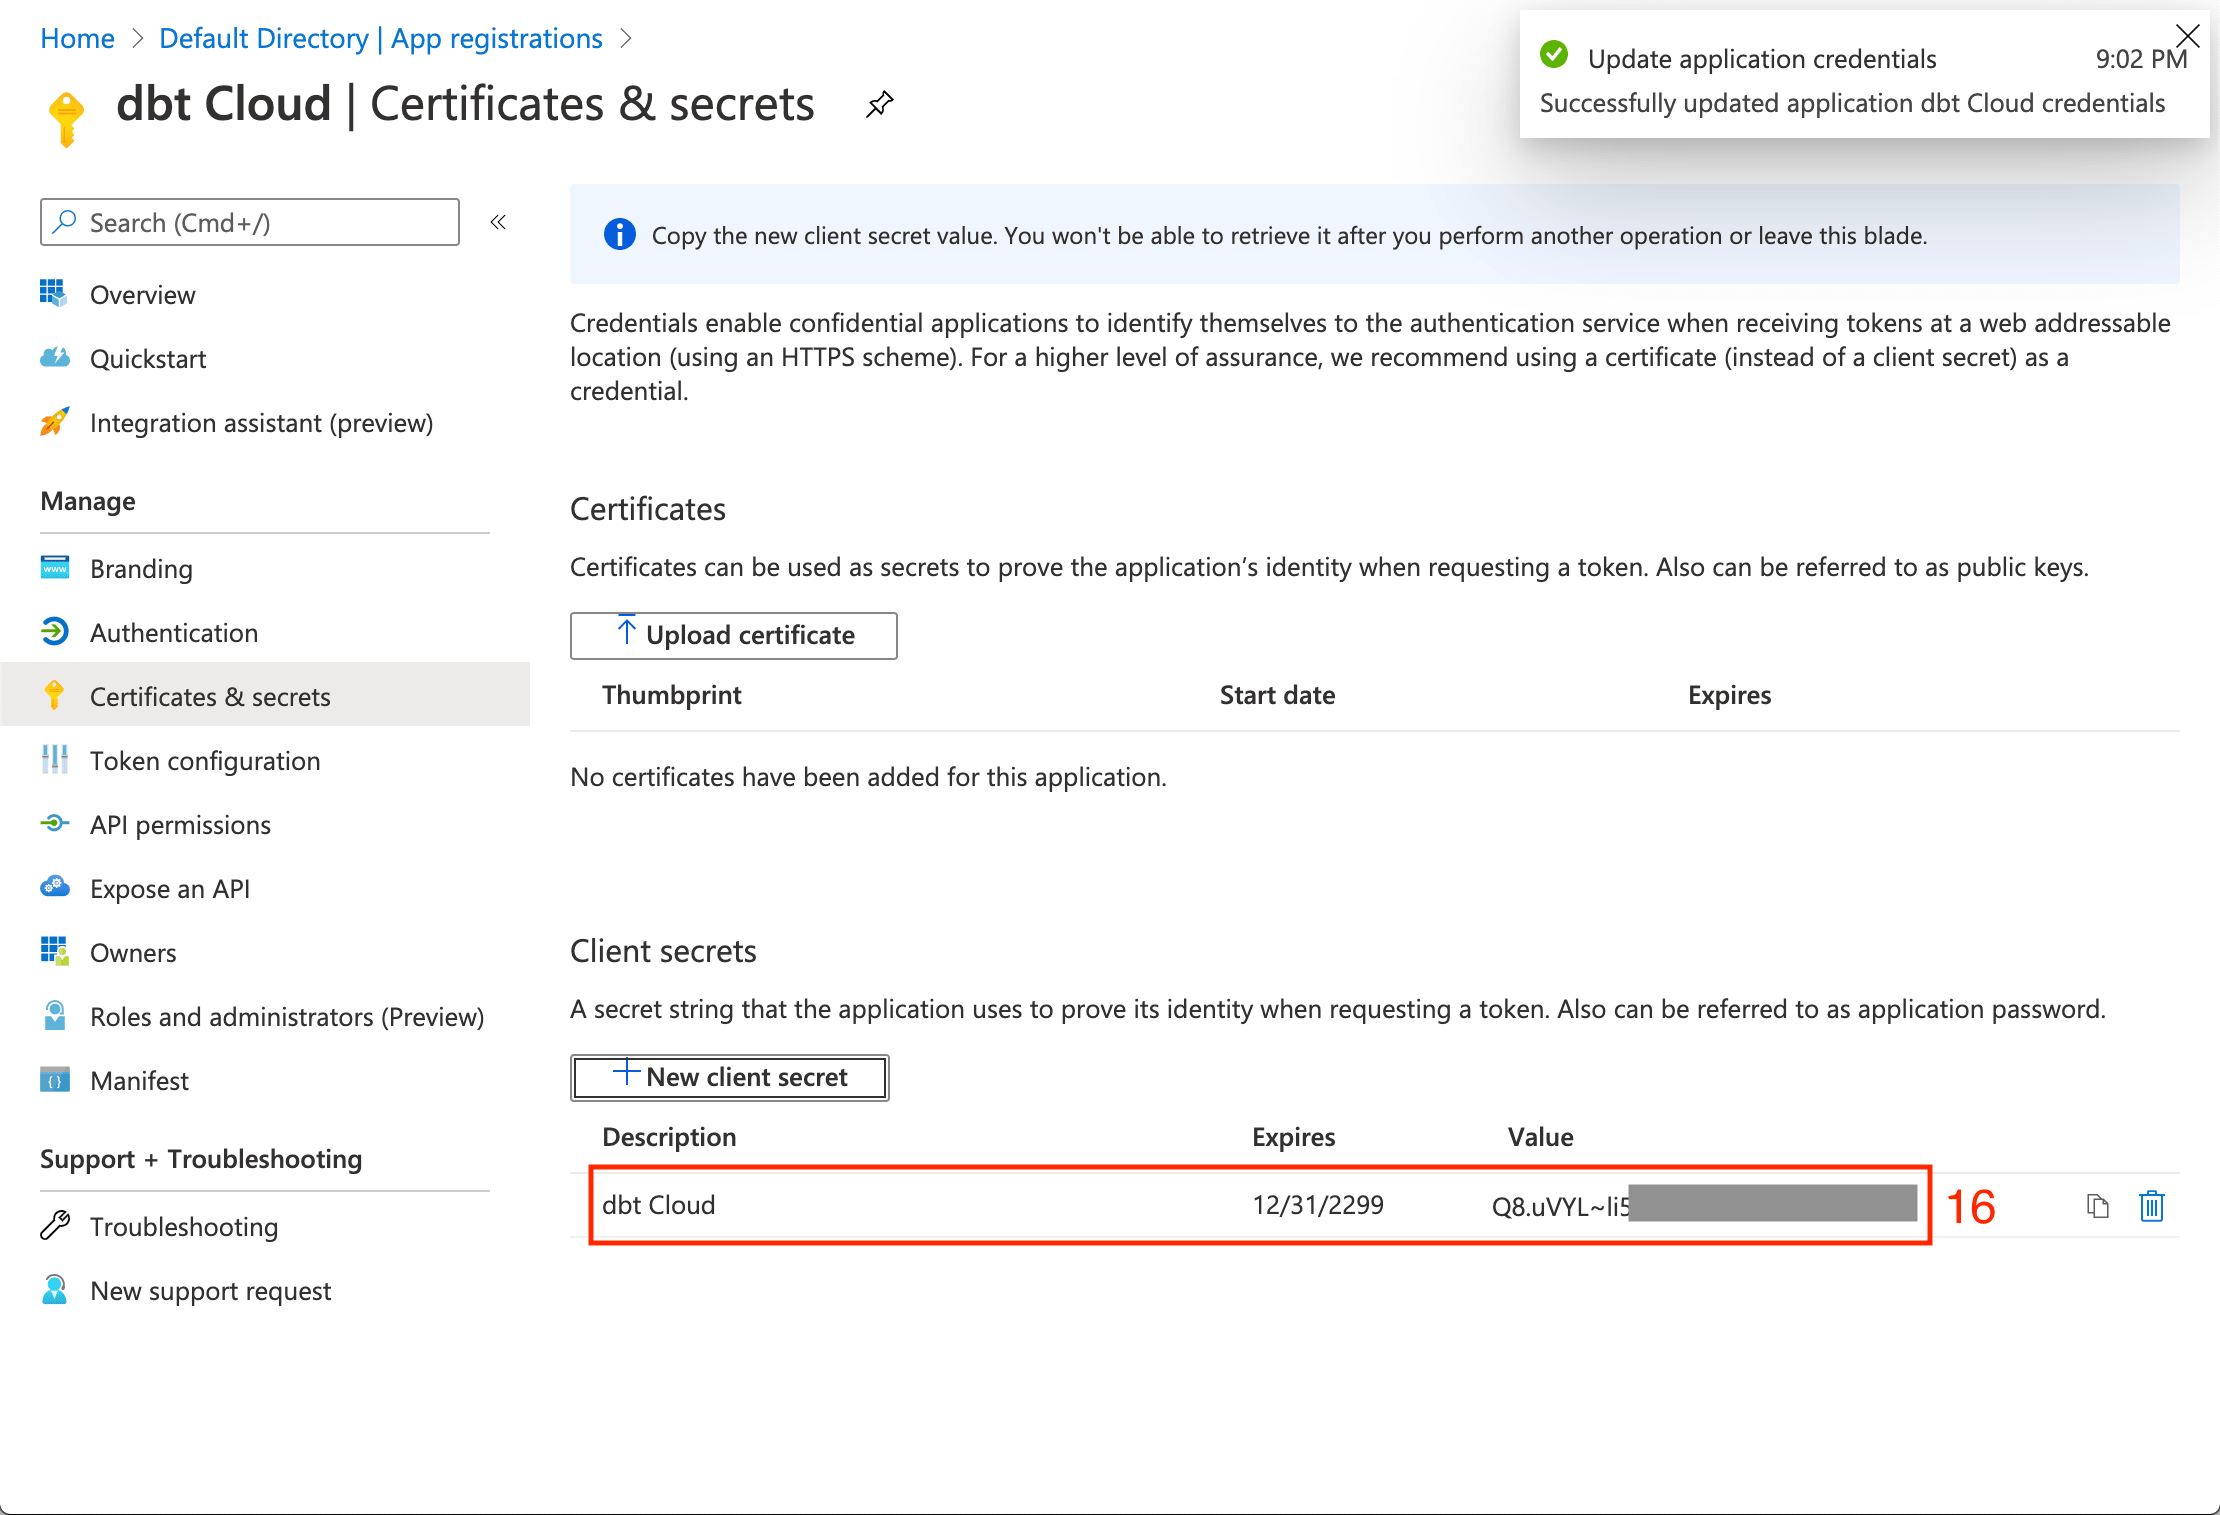 Recording the client secret
Collect client credentials
- Navigate to the Overview page for the app registration.
- Note the Application (client) ID and Directory (tenant) ID shown in this form and record them along with your client secret. We'll use these keys in the steps below to finish configuring the integration in dbt.
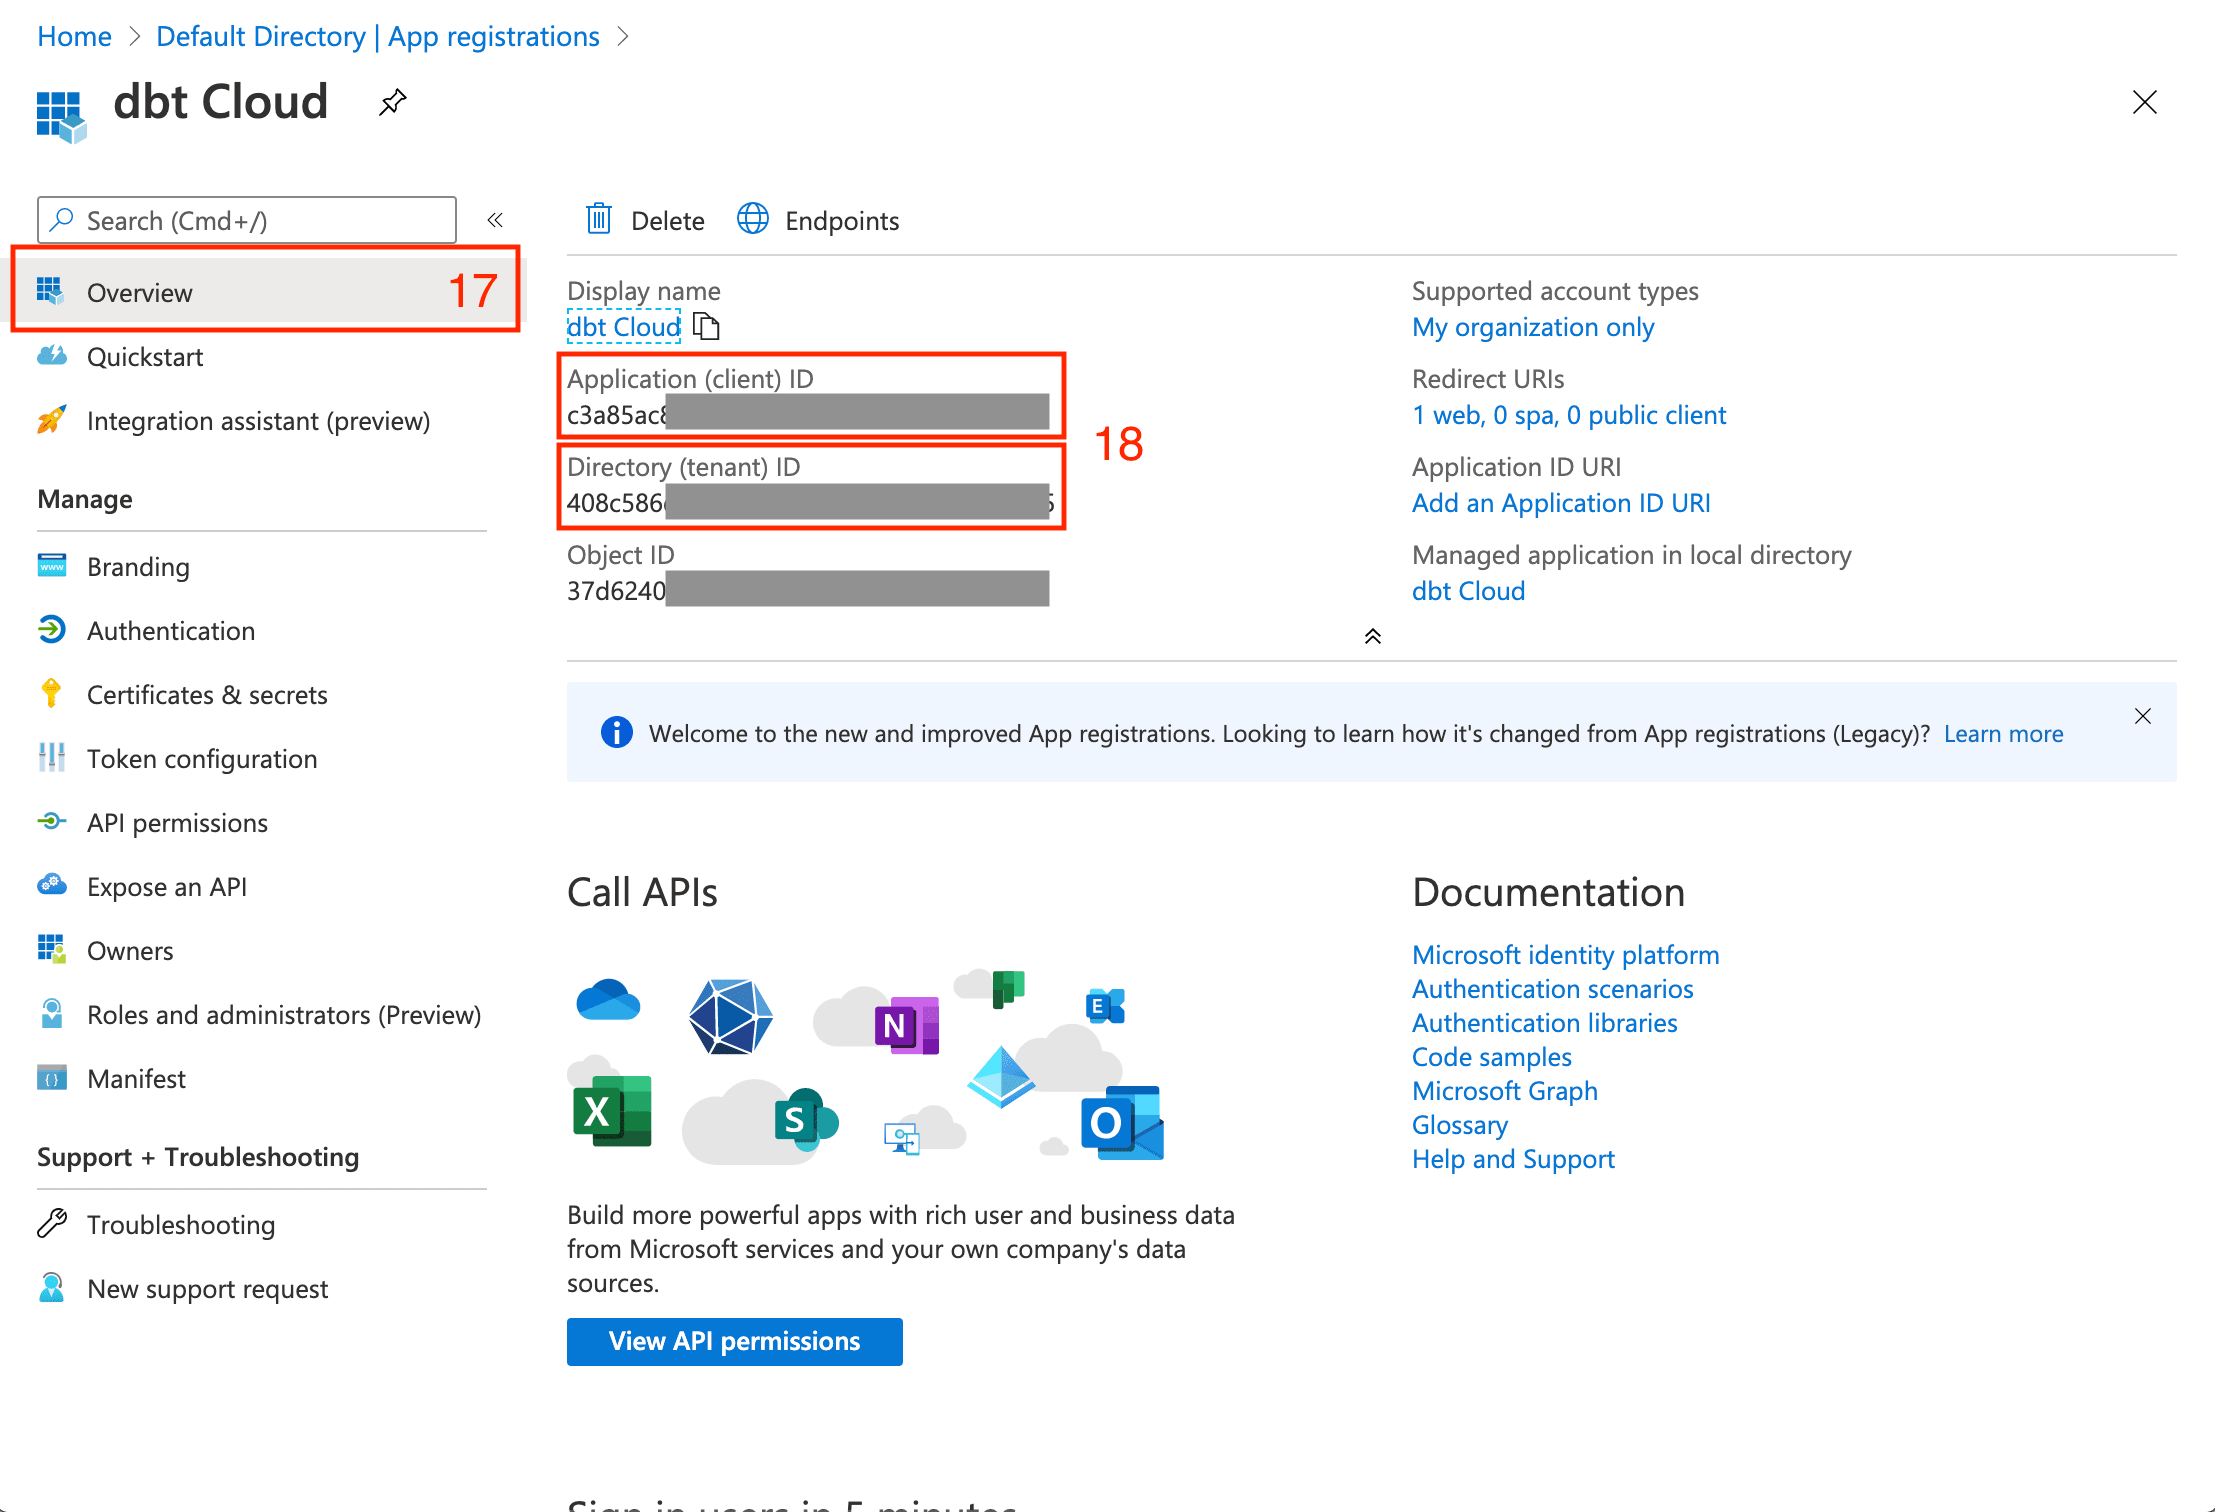 Collecting credentials. Store these somewhere safe
Configuring dbt
To complete setup, follow the steps below in the dbt application.
Supplying credentials
To complete this section, you will need your login URL slug. This slug controls the URL where users on your account can log into your application. dbt automatically generates login URL slugs, which can't be altered. It will contain only letters, numbers, and dashes.
For example, the login URL slug for dbt Labs would look something like dbt-labs-afk123.
Login URL slugs are unique across all dbt accounts.
Users can also sign in at https://login.dbt.com to see accounts they have access to across instances. The enterprise login URL that includes your slug remains the URL used for IdP-initiated SSO flows with your identity provider.
- From dbt, click on your account name in the left side menu and select Account settings.
- Click SSO & SCIM from the menu.
- Click Get started if SSO has not been configured, or Edit if it has already been set up.
- Supply the following SSO details:
| Field | Value |
|---|---|
| Log in with | Microsoft Entra ID Single Tenant, or Microsoft Entra ID Multi Tenant if you configured a multi-tenant Supported account types value |
| Client ID | Paste the Application (client) ID recorded in the steps above |
| Client Secret | Paste the Client Secret (remember to use the Secret Value instead of the Secret ID) from the steps above; Note: When the client secret expires, an Entra ID admin will have to generate a new one to be pasted into dbt for uninterrupted application access. |
| Tenant ID | Paste the Directory (tenant) ID recorded in the steps above. (This field only appears when you select Microsoft Entra ID Single Tenant; it is not needed for multi-tenant). |
| Microsoft Entra ID Domain | For single tenant, enter the domain name for your Azure directory (such as fishtownanalytics.com). Only use the primary domain; this won't block access for other domains. For multi-tenant, enter the matching authority string (organizations, common, or consumers) instead. Refer to Supported account types table. |
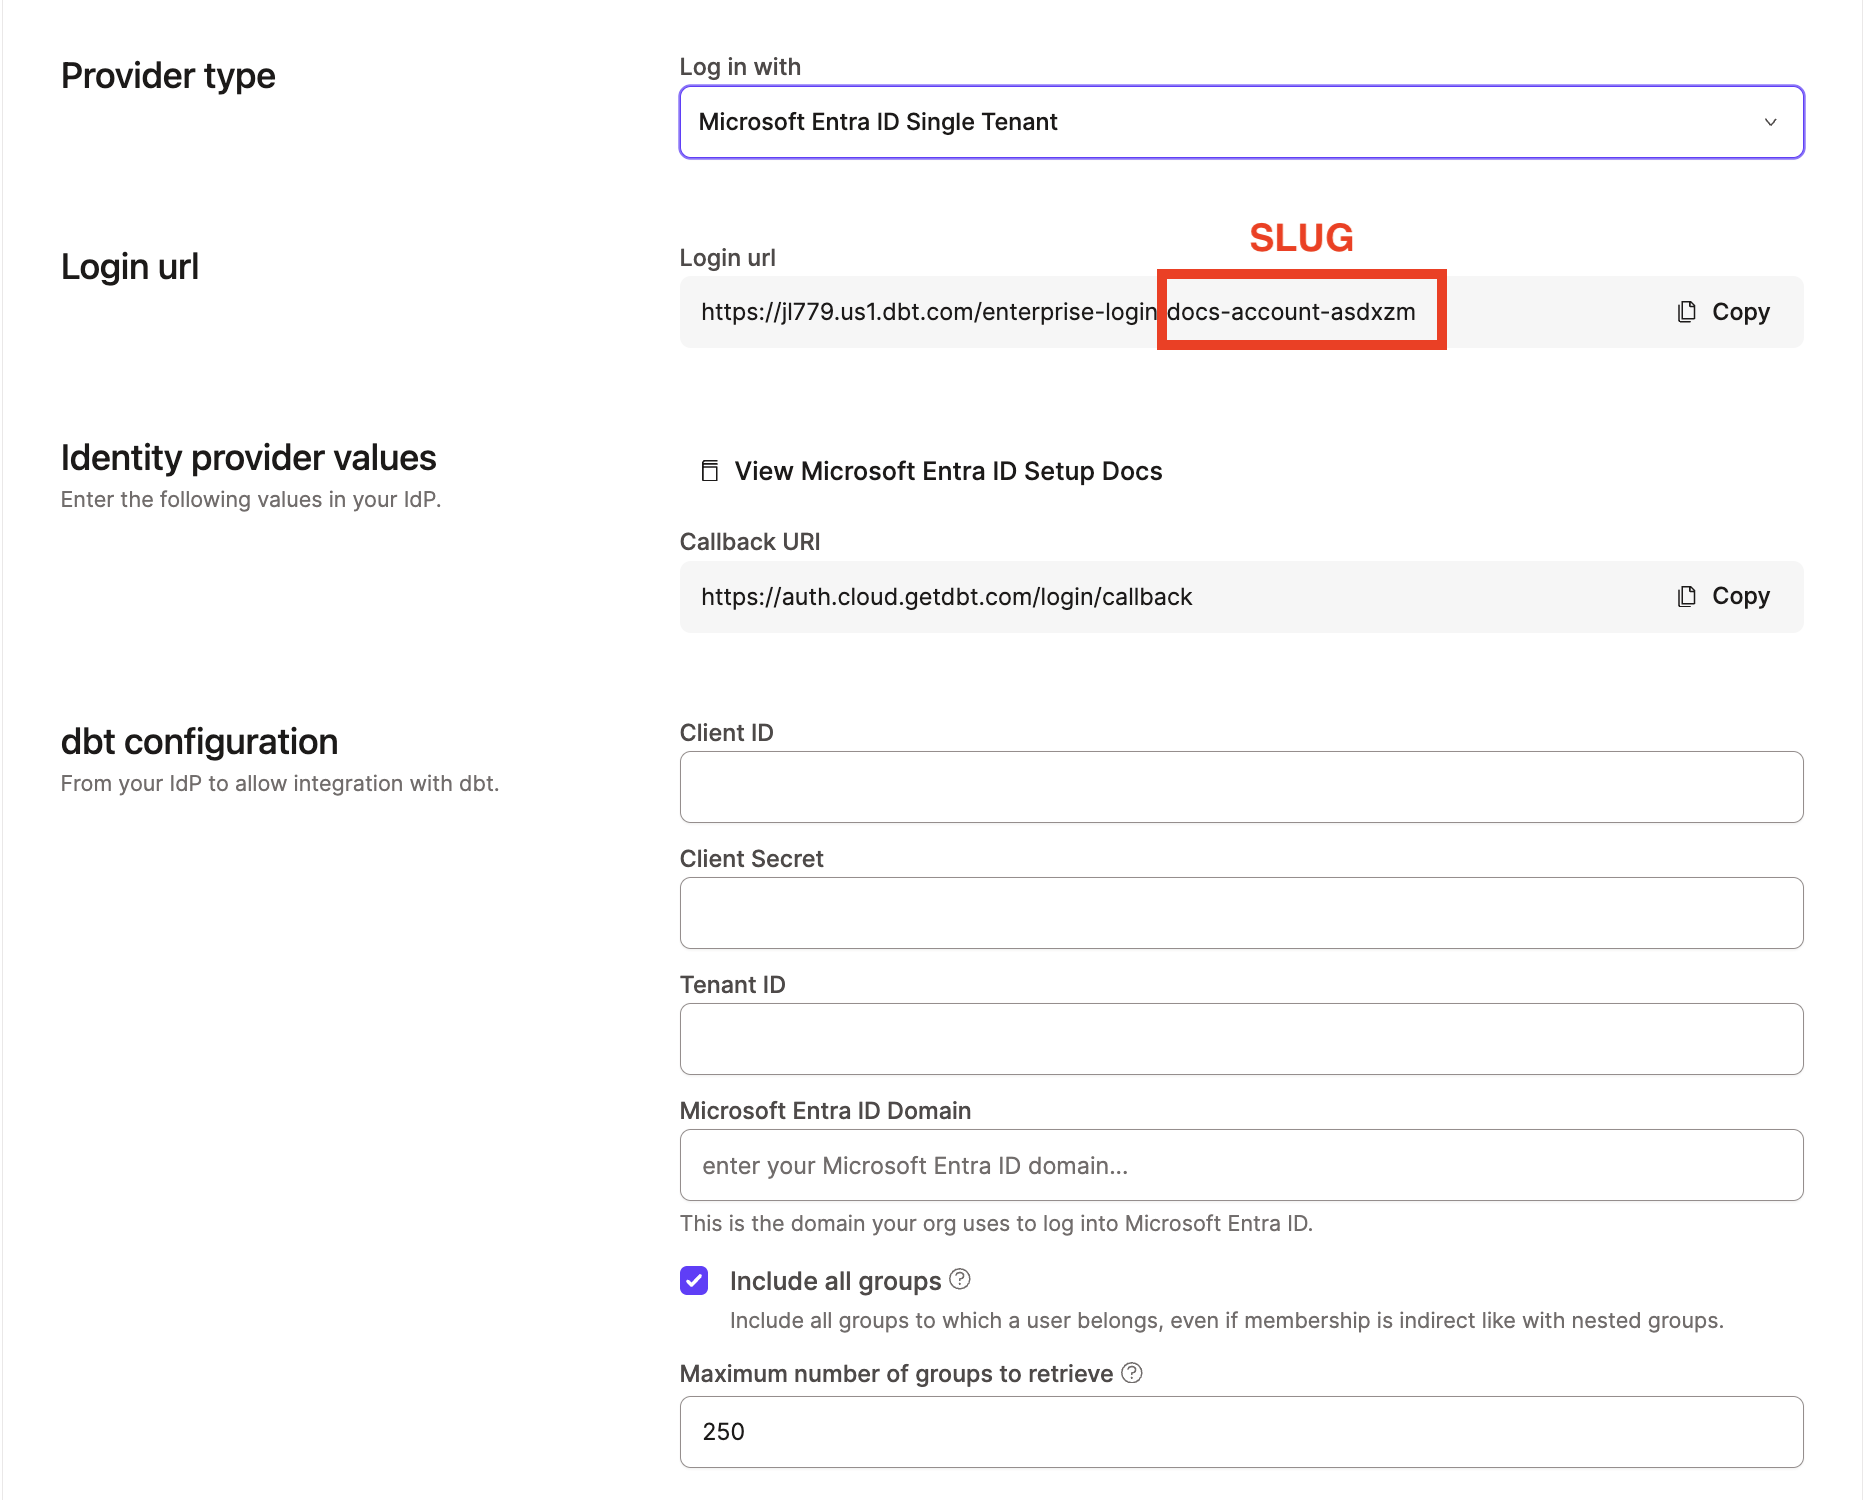 Configuring Entra ID AD SSO in dbt
- Click Save to complete setup for the Microsoft Entra ID SSO integration. From here, you can navigate to the login URL generated for your account's slug to test logging in with Entra ID.
Users can sign in at https://login.dbt.com to view accounts they have access to across instances and choose where to open dbt platform. This is the recommended entry point for most users.
For SSO through your identity provider, you can also use the following URL format with your account login URL slug. Replace LOGIN_SLUG with the value from the previous steps and YOUR_ACCESS_URL with the appropriate Access URL for your region and plan:
https://YOUR_ACCESS_URL/enterprise-login/LOGIN-SLUG
Account administrators can turn account discovery on or off with Enable global account discovery in Account settings.
Additional configuration options
The Single sign-on section also contains additional configuration options which are located after the credentials fields.
-
Include all groups: Retrieve all groups to which a user belongs from your identity provider. If a user is a member of nested groups, it will also include the parent groups. When this option is disabled, only groups where the user has direct membership will be supplied. This option is enabled by default.
-
Maximum number of groups to retrieve: Provides a configurable limit to the number of groups to retrieve for users. By default, this is set to 250 groups, but this number can be increased if users' group memberships exceed that amount.
Setting up RBAC
Now you have completed setting up SSO with Entra ID, the next steps will be to set up RBAC groups to complete your access control configuration.
Now that you've set up SSO with Entra ID, you can set up SCIM to automate user and group provisioning.
Troubleshooting tips
Domain name mismatch
Ensure that the domain name under which user accounts exist in Azure matches the domain you supplied in Supplying credentials when you configured SSO.
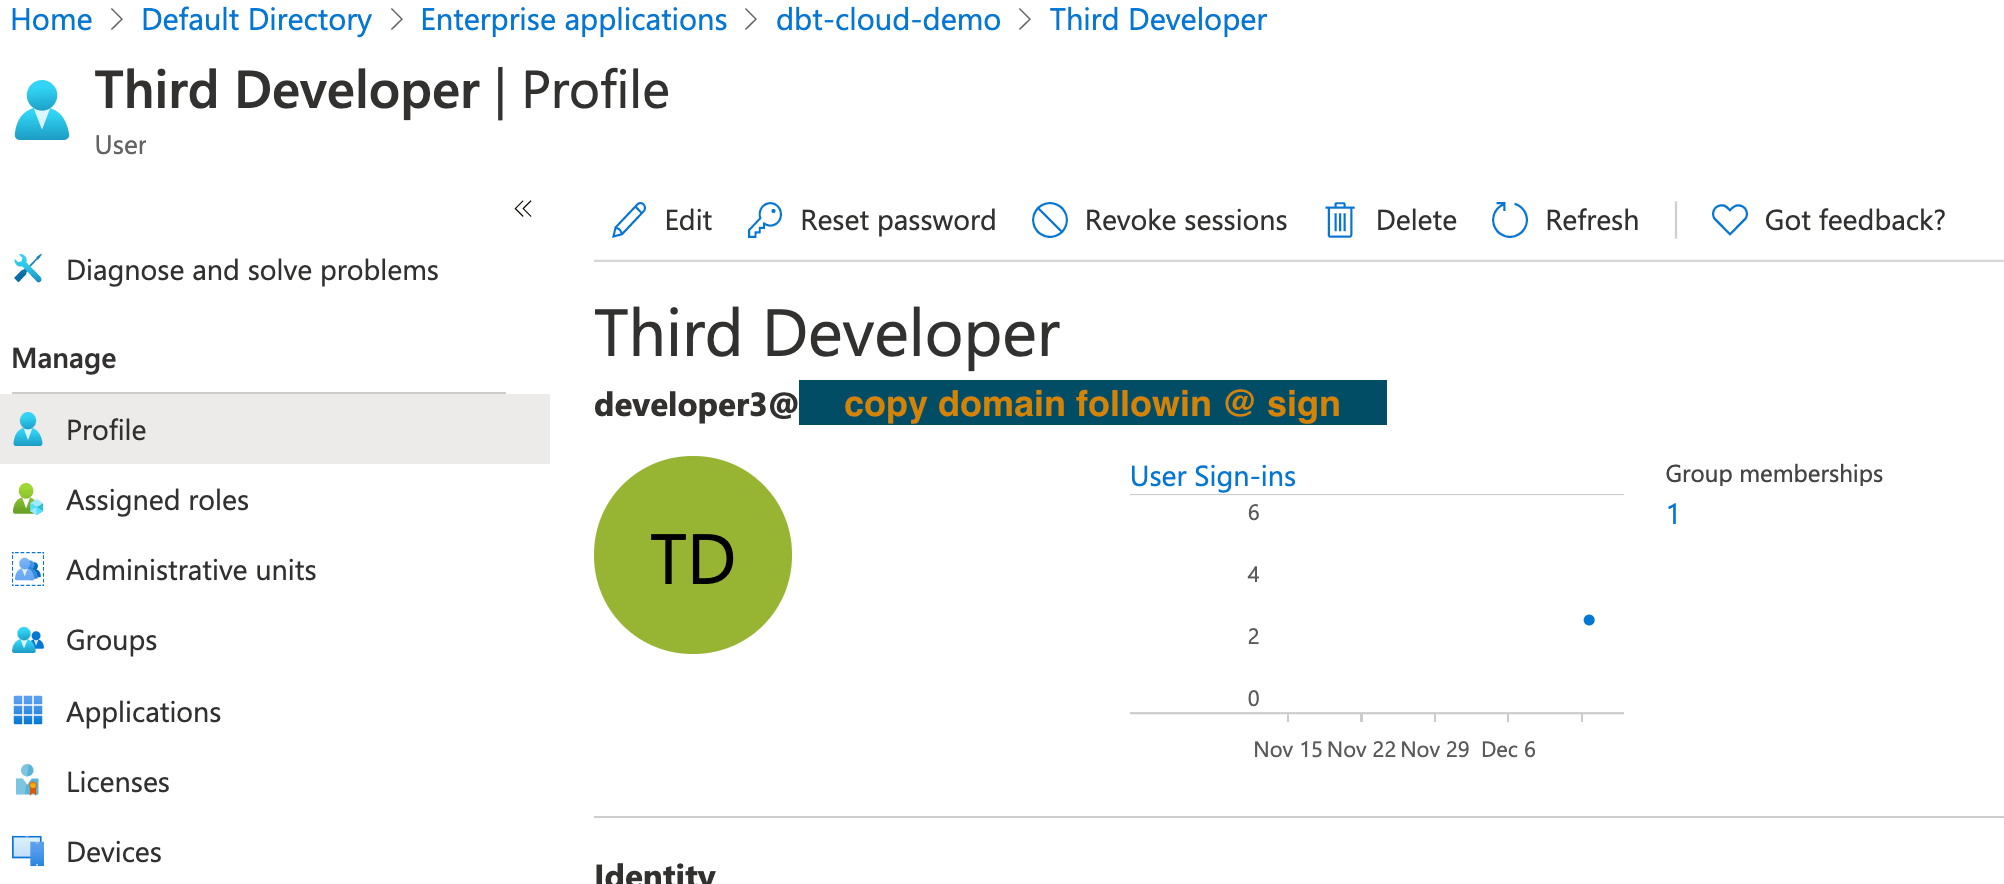 Obtaining the user domain from Azure
For additional troubleshooting — including "Admin consent required" prompts for new users, "Access Denied" after SAML authentication, and issues with Entity ID or ACS URL changes — refer to SSO FAQs and troubleshooting.
Learn more by video
The following video explains how to set up SSO with Microsoft Entra ID:
Was this page helpful?
This site is protected by reCAPTCHA and the Google Privacy Policy and Terms of Service apply.